Not to toot our own horn anything — but people are really into EditMate’s Video Editing Service.
Here’s what a few said after wrapping up a project:
“I loooove it! No changes needed to music or content. Thanks team – as always, love ya work.”
– Marketing Manager at The International Travel College of New Zealand
“You guys NAILED it. It really is exactly what I was looking for, thank you.”
– Head of Media Collective at Bauer Media Group
“I have very high expectations and would rate EditMate by far and away the best company we have ever worked with. Period. It’s not even close.”
– CEO of Grit ‘N Wit
So… okay, I guess we are tooting on our horn. (Toot toot. ? )
But my point is: our Video Editing Service enables businesses to create more video content, in a way that’s easier than ever. You just upload footage (of any kind! — old videos, footage you shot yourself or mobile videos you collect from employees or customers) and a vetted video editor will cut into a fresh, polished, on-brand video.
Easy, right?
Well, we want to make it even easier! So today we’re sharing our…
TOP TIPS ON HOW TO WORK WITH A VIDEO EDITOR!
While we’ll frame these tips as how to work with an EditMate Editor within our Dashboard — they’re all pretty much applicable to working with an Editor you find anywhere: the in-house one at your agency, a random one you hire online, or even just your friend that’s doing you a favor by editing your video.
Because if you’ve never worked with an editor before or don’t know anything about the video editing process… you might be a little hesitant to start a project.
But you don’t need to be.
We’re going to tell you everything you need to know to ensure that the entire experience is super smooth and painless for everyone involved.
Read on to learn our top 6 tips:
1. Give them everything up front
And we mean everything! ALL of the footage you want to use, fonts, colors, logos, brand guidelines, graphics, script, everything.
If you’re super organized, an outline or storyboard can be useful too (but don’t worry, 90% of the clients we work with don’t supply those and just let our Editors get creative).
If mid-project it becomes apparent more assets are needed, our Editors will, of course, create graphics or search for stock footage to supplement… BUT the more you supply to use up front, the better.
2. Share Your Goals
In the Creative Brief section, tell us where this video will live, who the audience will be and what you want them to take away from watching it.
- Do you want them to click right to your website to buy your product?
- Do you want to boost warm and fuzzy feelings about your brand?
- Maybe, you want to build buzz and let others know how fun it is to work at your company because you’re going to be hiring again soon.
Let us know what your goals are for the video so we can craft a cohesive story with a killer call to action to help accomplish ‘em.
>> HOT TIP: When you’re filling out a “New Project” page in the Dashboard…. Next to each of the sections there is a little info icon. If you hover over those info icons, you can read short directions that will help you fill out each of the sections, like explaining what information you should include in a Creative Brief, what “Video Outputs” means, and other helpful hints.
3. Show, Don’t Tell
It can be tough to explain your vision for a video, so provide examples (with links!) of other videos you like and want to emulate.
These could be other videos your business has produced (so your new video can look consistent and be on-brand) or just other videos online you love because of their energy, style or format. And note what you like about them too, as in “I like the way the text moves in and out”, “I like the music track” or “I like the split screen style they used when showing b-roll”.
Provide links to these videos in your creative brief so your Editor can get the full of idea of what you want.
4. Add feedback right to your clips!
Once you’ve uploaded video clips or collected mobile footage from your crew, they’ll all live in the “Project Videos” section of your project. If you want to share more information with your Editor about specific video clips, you can do it 2 ways:
a) On the video thumbnail, give it a thumbs up or thumbs down to let your Editor know this clip is good (or isn’t good) to use.
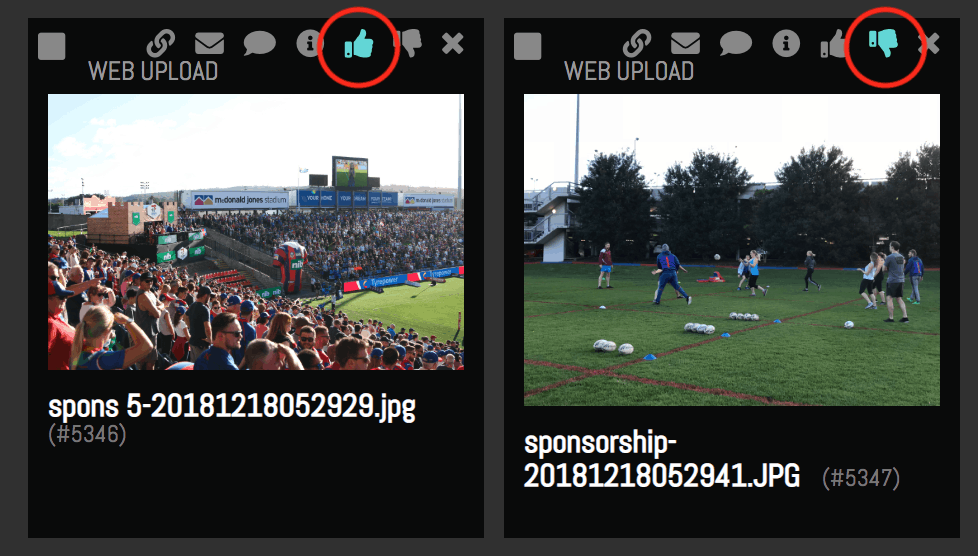
Give a specific video clip a thumbs up or a thumbs down to let the Editor know if you want to use it.
b) Add a comment to the clip by clicking the comment bubble icon on the video thumbnail. This will pop up a dialogue box and you can add a comment right to the clip. Your comment will be displayed on the clip AND noted in the Chat Box so your Editor will know it’s there. Additionally, when your Editor downloads your videos to work on your project, your comments are also downloaded as .txt files with each clip, making it easy for the Editor to remember your comments.
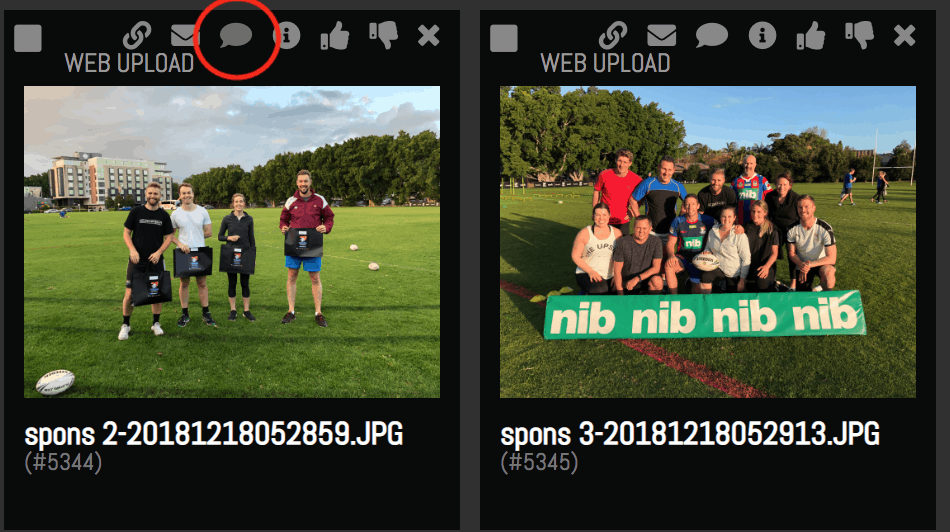
Click the comment bubble icon to add a comment to a specific clip.
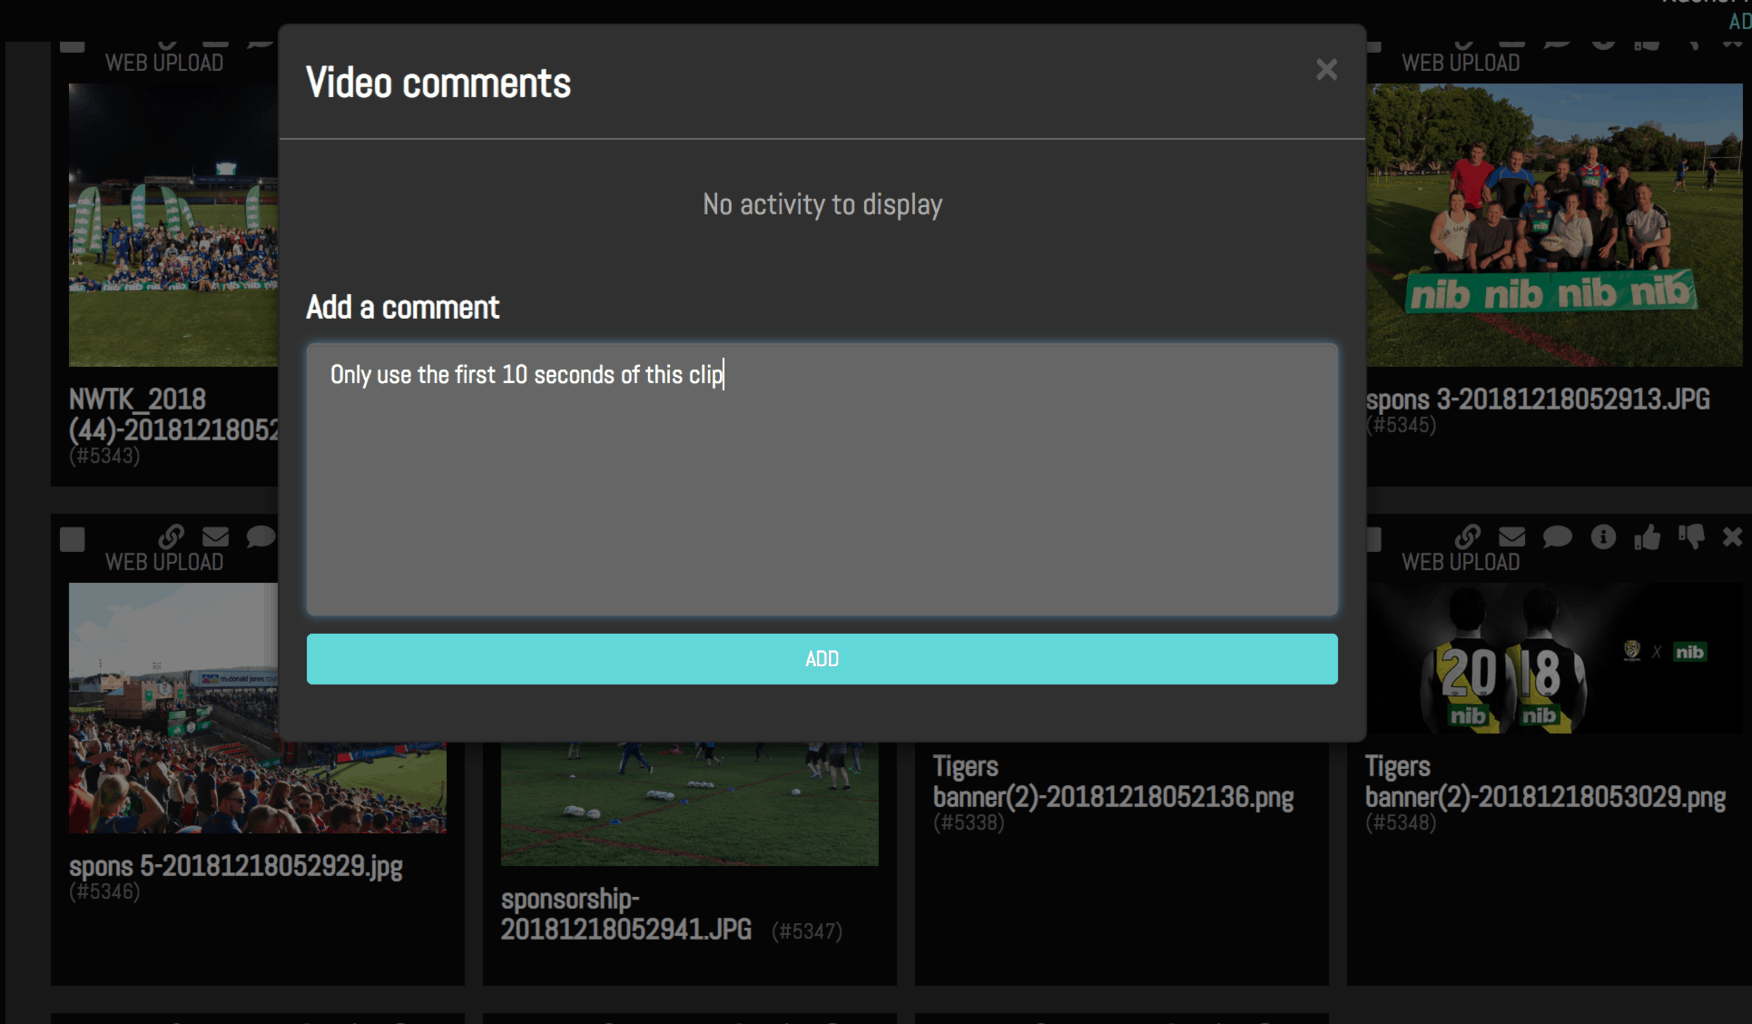
Add a comment with details your Editor should know about a specific clip.
5. Get the whole team on board the FIRST DRAFT
At EditMate, we include 2 rounds of revisions for each project. So, it’s important that all your stakeholders (stakeholders = everyone that is involved in the approval of the video) see and give feedback on the FIRST draft.
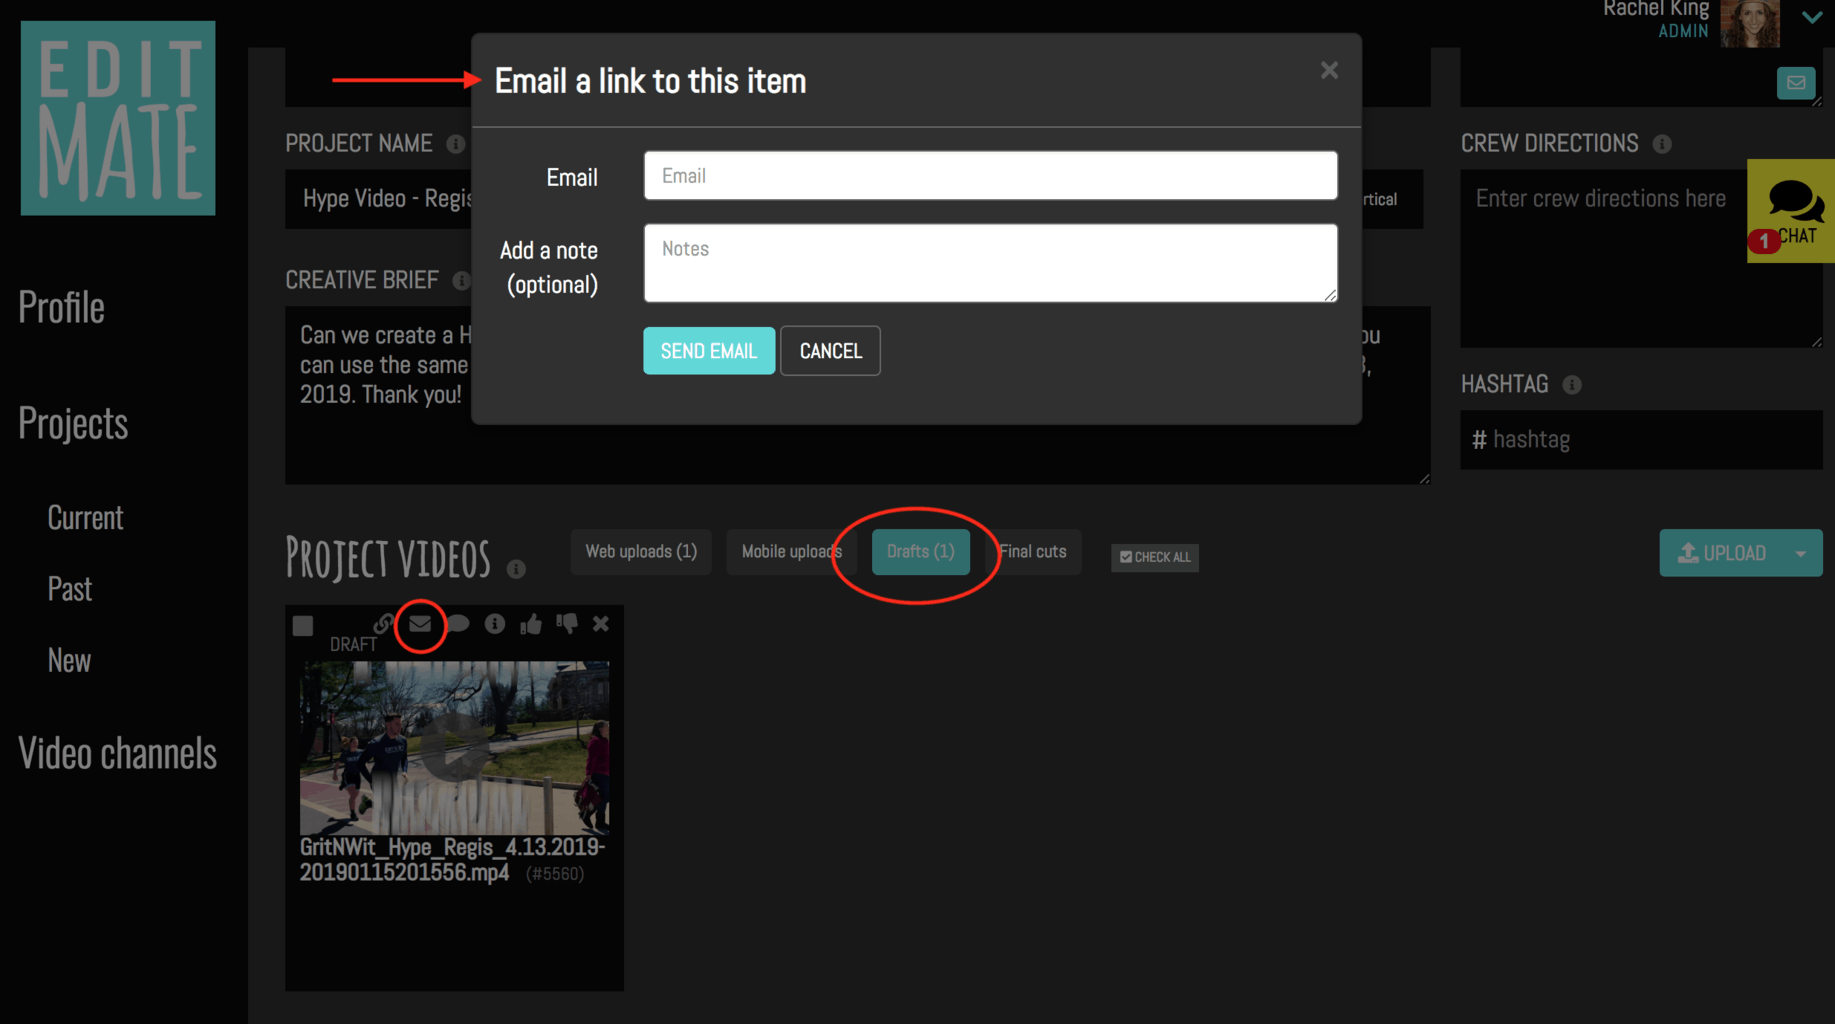
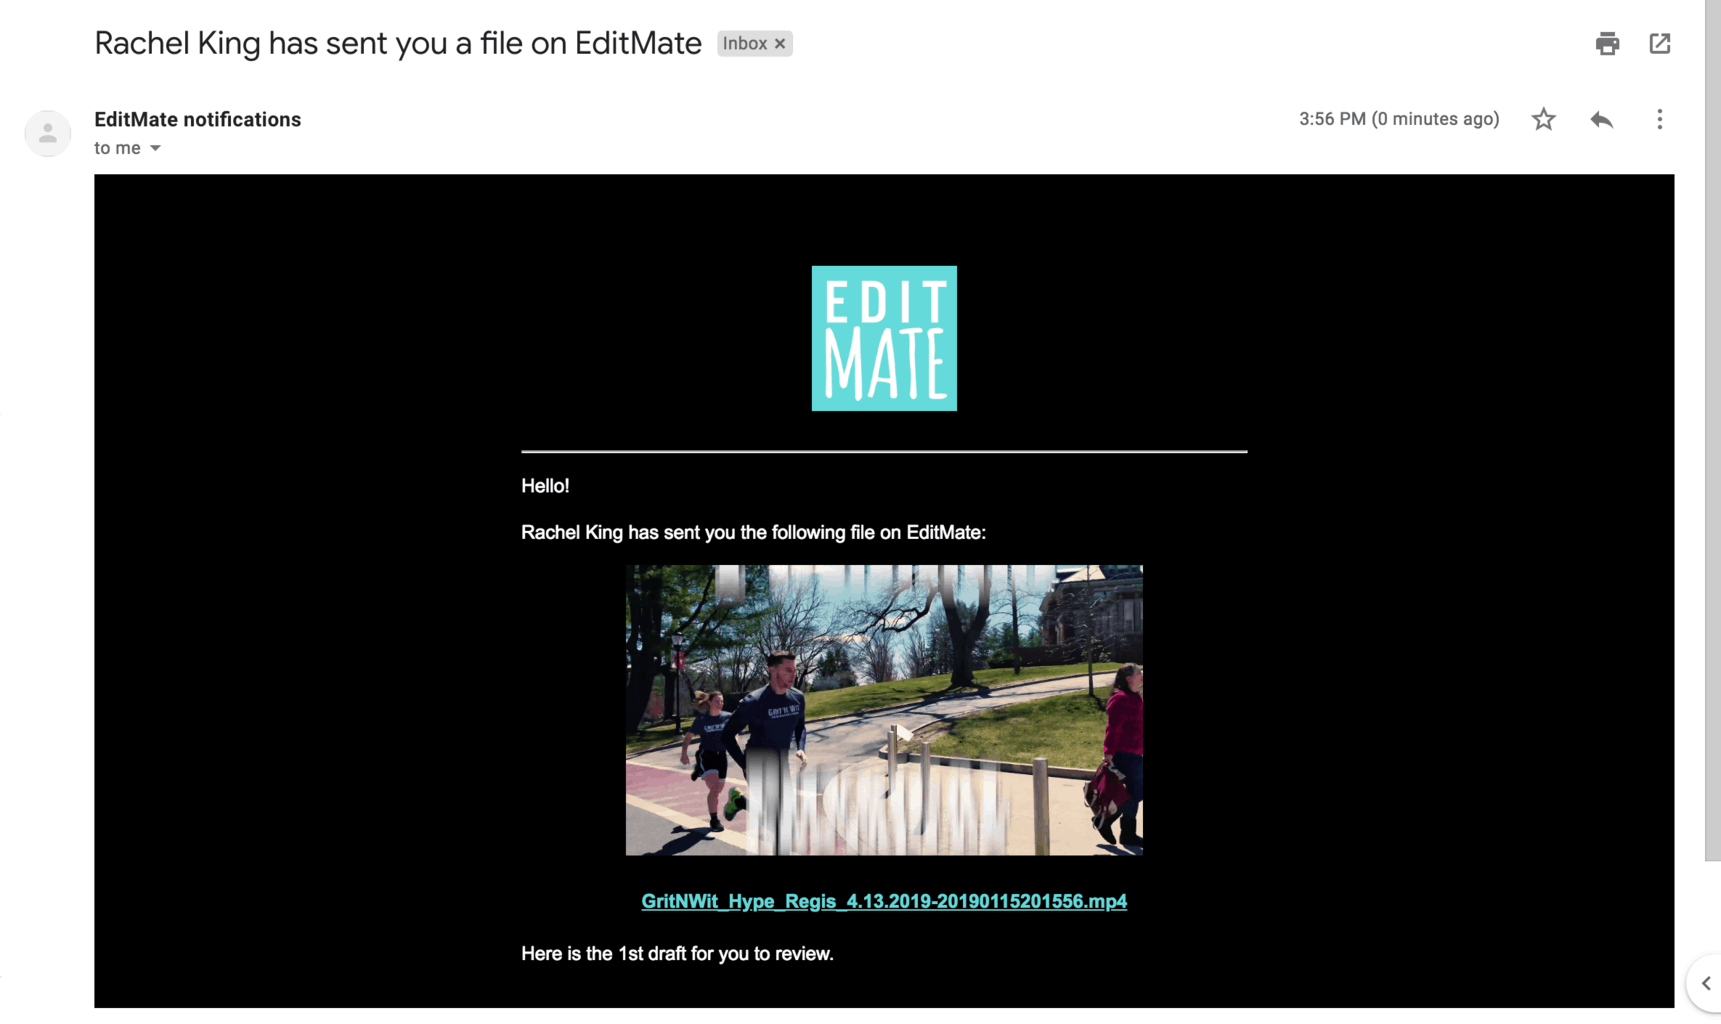
>> HOT TIP: If you want to share the draft, just click the envelope icon on the draft video thumbnail and a dialogue box will pop up where you can put the email addresses in of everyone you would like to watch the video. They’ll receive an email with a link that looks like the 2nd image below:
Whether it’s 2 people or 25 people, make sure ALL of them watch and review the first draft.
By doing this, major things like the music track, graphic styles and overall content can get nailed down in the first round of revisions and the 2nd round can focus on smaller, more detailed refinements that will ensure your final video is the absolute bee’s knees. ?
6. Provide organized, consolidated feedback
On the Dashboard, you and your team (the other Producers on your account) can send feedback on the video via the Chat Box. It’s important that everyone involved in the review process provides unified feedback — instead of everyone sending their own opinions and requests will-nilly, whenever the mood strikes.
Because even though you’re all working towards the same goal for the video, you may not always agree! And having multiple people request changes that may not align, makes for a very confused Editor and extra rounds of revisions — which slows the process down and may hike up your project bill.
So on your end, make sure everyone communicates with each other to decide what revisions are needed and THEN send that organized, consolidated feedback to your Editor.
That’s it!
Follow these 6 tips to ensure that you work with a video editor and manage your project in the most efficient way possible.
We hope these tips are helpful for your next project and get you to a final video you absolutely love.
Still got questions? CONTACT US anytime. ?